

PU Stone Panel Installation: Detailed Step-by-Step Guide & Treatment of Base Surface
Polyurethane Polymer PU Stone Panel features light weight, easy installation and strong wall adaptability, making it a popular choice for wall decoration. To ensure a flat, firm installation effect with beautiful and durable finished results, below is a standardized complete installation guide suitable for most wall surfaces. The whole process is clear and easy to understand, even beginners can operate it effortlessly.
CONTENTS
- Base Surface Preparation
- Installation Process
- Reinforcement Fixing
- Finishing Process
-Base Surface Preparation
Wall flatness and verticality inspection: Use a 2m level ruler for inspection. Level the wall first with cement mortar or putty if the deviation is more than 5mm.
Special base treatment: Apply interface agent and moisture-proof treatment to gypsum board or wooden board walls; roughen or paint interface agent on concrete walls.
Construction environment requirements: Construction temperature 5-35℃, wall moisture content below 10%, no water seepage and dampness.
Note: Uneven or damp base surface will cause hollowing and falling off of panels, which is the most common failure reason for PU stone panel installation.
Two Common Wall Leveling Methods Before Installing PU Stone Panels
Before installing PU stone panels, the flatness of the wall substrate directly affects the final installation result and service life.
There are two common leveling methods: one is leveling the base surface with cement mortar, and the other is structural leveling using a framework system. Different wall conditions require different construction solutions.
Ⅰ. Cement Mortar Leveling Method
Suitable for: Indoor walls with relatively small surface deviation and good substrate strength, such as cement walls and brick walls.
1. Substrate Inspection and Cleaning
First, check whether the wall has hollow areas, cracks, sanding, peeling, or other defects. Remove dust, oil stains, and loose layers to ensure the substrate is solid and stable.
2. Marking and Layout
Mark horizontal and vertical reference lines according to the design dimensions and PU panel installation positions to ensure overall wall flatness during installation.
3. Wall Surface Moistening
Before construction, lightly spray water to moisten the wall surface and prevent the substrate from absorbing water too quickly, which may cause mortar cracking or weak bonding.
4. Cement Mortar Leveling
Apply cement mortar or specialized leveling materials to level the wall surface.
Use a straightedge ruler to check flatness and keep the surface deviation within 3 mm whenever possible.
5. Internal and External Corner Adjustment
Pay special attention to inside and outside corners to ensure they are straight and vertical, making PU panel joint finishing easier later.
6. Curing and Drying
After leveling, allow the substrate to dry thoroughly. A curing period of 3–7 days is generally recommended to avoid excessive moisture affecting adhesive installation.
7. Sanding and Final Inspection
Raised areas can be sanded and corrected locally. Confirm the wall is fully level before installing PU stone panels.
Ⅱ. Framework (Keel) Leveling Method
Suitable for: Walls with large surface deviations, renovation of old walls, exterior wall projects, or installations requiring hidden lighting, concealed pipelines, or decorative feature walls.
Common Framework Materials: Wooden framework, Galvanized light steel framework, Aluminum alloy framework
Among them, light steel frameworks offer better stability and are more suitable for long-term use.
1. Wall Measurement and Layout
Measure the wall’s verticality and flatness first, then determine the framework thickness and installation spacing according to the wall deviation.
2. Fixing the Main Framework
Use expansion screws to secure the main framework to the wall.
The spacing is usually maintained at 300–600 mm horizontally or vertically, adjusted according to the PU panel dimensions and structural layout.
3. Overall Flatness Adjustment
Adjust the front and back position of the framework using shims, adjustment fittings, or a laser level to ensure all sections remain on the same plane.
This is the most critical step in framework leveling.
4. Installing Base Boards (Optional)
Some projects add boards such as: OSB boards, Plywood
To the outer side of the framework to improve screw-holding strength and overall stability.
5. Reserving Structures and Hidden Details
The framework system can reserve space in advance for: Lighting channels, Electrical conduits, Inside corner finishing, Floating background wall structures, etc.
This makes it easier to achieve integrated hidden-design effects later.
6. Installing PU stone panels
After leveling is completed, PU stone panels can be installed using construction adhesive, nail-free adhesive, or screw fixing methods, followed by joint finishing in sequence.
Layout Planning
Pre-layout: Simulate panel arrangement on the ground, check texture and color difference, and mark cutting positions.
Internal and external corner treatment: Place incomplete panels at internal corners or blind areas first; plan the closing method for external corners in advance.
Line marking positioning: Snap reference lines with a laser level or ink line to ensure panels are aligned horizontally and vertically.
Note: Pre-layout in advance avoids inconsistent texture and color difference after installation; line marking positioning prevents overall installation skew.
Panel Pre-treatment
Wipe the back of panels with a dry cloth to remove dust.
Color and texture screening: Use panels from the same batch for one wall to avoid obvious color difference.
Cutting and trial assembly: Cut edge panels in advance, confirm size fitting by trial assembly before gluing.
Note: Wiping dust off the back greatly improves adhesive bonding force; trial assembly in advance avoids cutting errors after gluing.
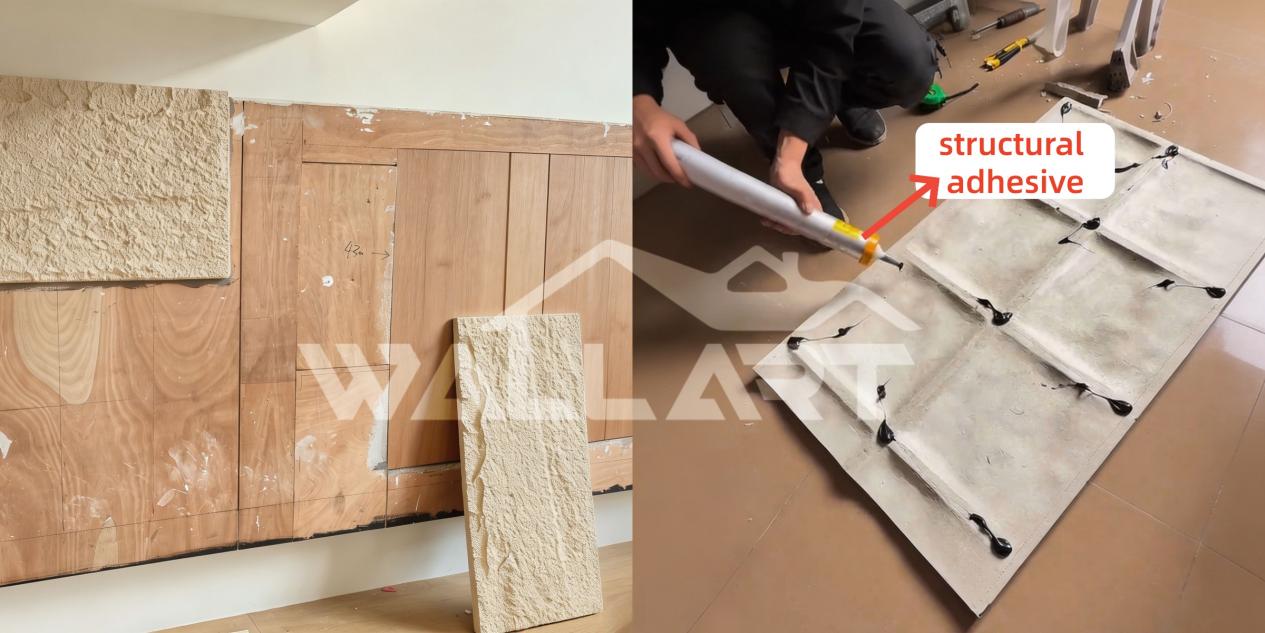
Gluing Application
Gluing method: Adopt combined dot and strip gluing. Keep adhesive coverage above 80%, and apply continuous glue along panel edges.
Standing time: Leave for 3-5 minutes after gluing (follow adhesive instructions), and install on wall until initial adhesion forms.
Large-size panel treatment: For panels larger than 60cm, apply a thin layer of adhesive on the wall as well to enhance bonding strength.
Insufficient adhesive coverage or direct installation without standing will cause panels to fall off later. Increase the dosage of waterproof backing adhesive or structural adhesive for outdoor and humid areas.
-Installation Process
Installation sequence: Install internal and external corner panels first, then extend to the middle to avoid closing problems.
Compacting and air exhausting: Press the panel from the center to surroundings with a rubber hammer or hands to exhaust air and prevent hollowing.
Temporary fixing: Fix panels with masking tape or temporary support after installation to prevent displacement before adhesive curing.
Pressing from the center to surroundings can avoid internal hollowing; temporary fixing prevents panels from sliding and shifting.
-Reinforcement Fixing
Use an air nail gun with fine nails to reinforce panels at edges and middle positions. Nail points can be placed at panel joints or inconspicuous positions, which can be covered with color-matched joint filler later.
Note: Control air nail strength moderately to avoid piercing or cracking the panel surface. If no air nail gun is available, use fine screws with gaskets for fixing and cover the nail points properly. Direct screw reinforcement is easy to crack PU stone panels, while gaskets can disperse pressure.
-Finishing Process
Adhesive curing time: Leave for 24-48 hours after installation; avoid collision and wiping during this period.
Joint treatment: Clean dust in gaps before joint filling, smooth the filler with a scraper, and wipe off excess filler with a damp cloth in a timely manner.
Finished product protection: Cover panels with protective film after construction to avoid pollution and collision from subsequent construction work.
Moving panels before adhesive curing will lead to bonding failure; uncleaned gaps will cause joint filler to fall off easily.
Follow the above steps to complete the installation of PU stone panels efficiently and create decorative walls with both texture and practicality. If you have special wall conditions or customized requirements during construction, feel free to contact us for professional installation guidance.