

Installation of Bamboo Charcoal Wood Veneer–OSB Base + Adhesive Method
Bamboo Charcoal Wood Veneer is widely used in wall decoration projects for residential, hotels, offices, and commercial spaces due to its natural texture, fast installation, and easy maintenance. Below is the installation method using OSB boards as the base layer and structural adhesive to fix the Bamboo Charcoal Wood Veneer.
1. Applicable Wall Conditions
This installation method is suitable for:
Bare cement walls
Lightweight partition walls
Gypsum board partition walls
Walls with poor flatness or uneven surfaces
2. Required Materials
Main materials:
ENF grade OSB boards
Auxiliary materials:
Structural adhesive
Expansion screws or self-tapping screws
Edge trims (depending on design requirements)
Masking tape or temporary fixing accessories
Tools:
Laser level or spirit level
Tape measure
Electric drill
Cutting machine
Glue gun
Rubber mallet
3. Installation Steps
Step 1: Substrate Inspection
Before installation, check the condition of the wall:
The wall must be solid, without hollow areas or cracks.
Clean dust, oil stains, and loose debris from the surface.
Repair severely uneven areas in advance if necessary.
It is recommended that the wall flatness deviation be controlled within ±5 mm to ensure the final installation quality.
Step 2: Installation of OSB Base Layer
Cut the OSB boards according to the on-site dimensions.
During installation:
Use a spirit level or laser level to set out and position the lines.
Place the OSB boards tightly against the wall surface.
Fix the boards using expansion bolts or self-tapping screws.
The fixing spacing is generally controlled at 300–500 mm.
Leave an expansion gap of about 2–3 mm between adjacent boards.
The bottom edge of the OSB panel needs to be kept about 5-10 cm above the ground to prevent moisture from rising.
After installation, ensure the entire base layer is firm, flat, and free from looseness.
# If the wall surface is smooth, you can skip the OSB backing and adhere the panels directly to the wall. Using aluminum alloy H-profiles at the joints ensures a more secure connection.

Step 3: Structural Adhesive Bonding Installation
Apply structural adhesive evenly on the back of the carbon crystal panel.
Recommended application method:
Combine dot application and bead/strip application of adhesive.
Adhesive spacing should be about 150 - 200 mm.
Increase adhesive amount around the edges to enhance fixing strength.
Then attach the panel to the OSB base layer and press it gently to expel air, ensuring full contact between the panel and the substrate.
After all panels are installed, use wooden supports for temporary fixation. Allow the adhesive to cure for 24 hours before removing the supports.
Step 4: Edge Trimming and Finishing
According to the design requirements, install:
U-shaped edge trims
L-shaped corner trims
Internal corner trims
External corner trims
The trims must be flush with the surface of the carbon crystal panels, and all joints should be tight with no obvious height differences.
Internal corner trims should cover the joint between two panels, while external corner trims should fully wrap around sharp edges.
After installation, use a soft cloth to clean off adhesive residue and dust. Ensure uniform joints and neat edges to enhance the overall decorative effect.
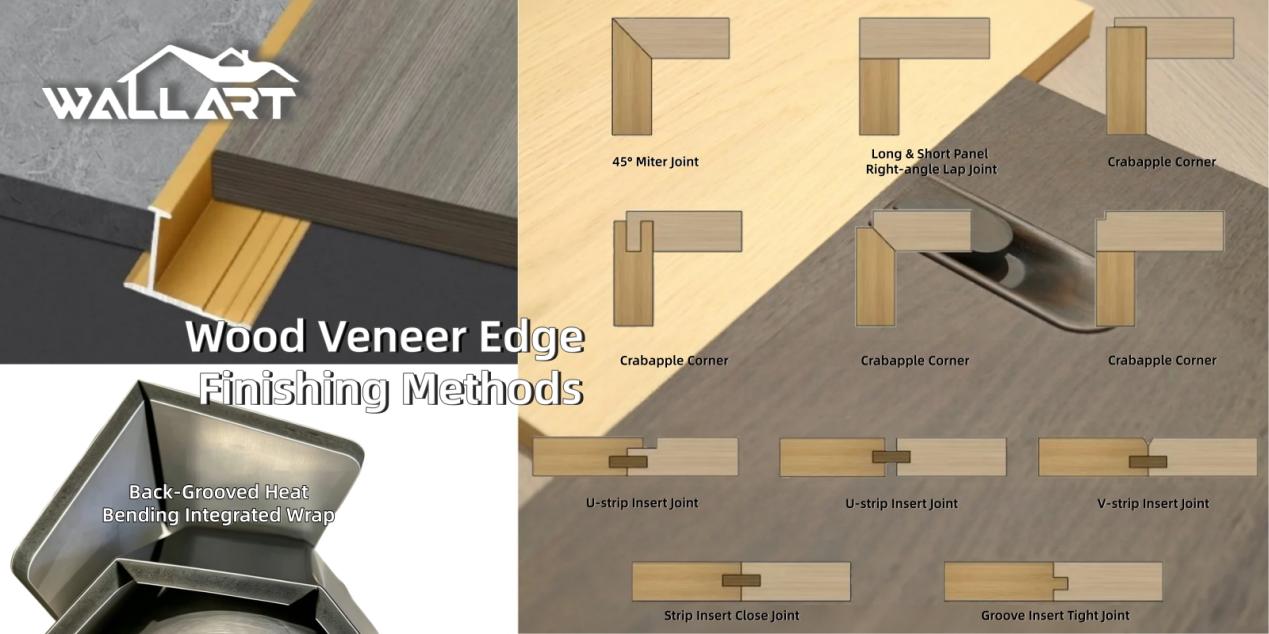
- External Corner Finishing Methods
1. Back-Grooved Heat Bending Integrated Wrap
Method: A 90°V-groove is cut on the back of the panel, leaving a thin surface layer. The panel is then heated and bent to wrap around the corner as a single piece without seams.
Advantages:
Seamless appearance, no joints.
No dust accumulation.
Strong overall integrity.
Disadvantages:
Requires grooving tools.
Demands skilled installers.
2. 45°Miter Joint
Method: Two panels are cut at 45°angles and joined at the corner, with color-matched adhesive used to fill the seam.
Advantages:
Clean edges
Minimalist and aesthetically pleasing appearance
Disadvantages:
High precision required for cutting and installation
Corners are prone to chipping
Higher labor cost
3. Beveled Corner (Chamfered Edge) Finishing
Method:
Panel edges are milled into a stepped bevel, leaving a slight gap after joining, which is filled with adhesive.
Advantages:
Softer and more impact-resistant edges
Less prone to cracking from thermal expansion
High-end appearance
Disadvantages:
More processing steps required
Higher cost
4. Sealed Gap with Adhesive Filling
Method:
Two panels are cut at 90°and installed with a gap at the corner, then filled with decorative adhesive.
Advantages:
Simple installation
Low material waste and cost
Disadvantages:
Visible adhesive lines
Easy to accumulate dust and turn dark over time
5. Overlapping Straight Edge Joint
Method:
One long panel is fixed against the wall, and a shorter panel overlaps the side edge to form a right-angle corner.
Advantages:
No visible front seam
Easy installation
Disadvantages:
Side seam is visible
Requires precise cutting
6. Metal Corner Trim Finishing
Method:
L-shaped or curved metal corner trims are used, with panels inserted and pressed into both sides of the trim for finishing.
Advantages:
High tolerance for installation errors
Hides cutting imperfections
Impact-resistant and durable
Fast installation
Disadvantages:
Exposed metal lines
Reduces the seamless wood veneer appearance
Step 5: Cleaning and Inspection
After installation is completed:
Clean off any residual adhesive on the surface.
Check whether all joints are straight and properly aligned.
Inspect whether there are any hollow or unbonded areas behind the panels.
Check the overall flatness and vertical alignment of the wall surface.
Once no issues are found, the installation can be handed over for use.
4. Construction Precautions
The construction environment temperature should be kept above 5°C.
Only high-quality, reliable construction-grade structural adhesive should be used.
Panels should be left on-site for at least 24 hours before installation to adapt to local temperature and humidity conditions.
Proper expansion joints should be reserved during large-area installation.
Moisture-prone areas should be treated with proper waterproofing and damp-proofing for the base layer.
5. Advantages and Disadvantages of This Installation Method
Advantages
High wall flatness
OSB base boards effectively correct substrate irregularities, resulting in a smoother and more aesthetically pleasing wood veneer finish.
Strong adaptability
Suitable for most wall conditions, especially ideal for old wall renovation and uneven wall surfaces.
Better sound insulation performance
The OSB base layer adds wall thickness, which can improve sound insulation to a certain extent.
Disadvantages
Higher construction cost
Compared with direct wall bonding, this method requires additional OSB materials and labor costs.
Space occupation
The base layer thickness is usually 9–18 mm, which slightly reduces indoor usable space.
Longer construction time
An additional base layer installation step is required, making the overall process longer than direct adhesion.
Higher moisture protection requirements
In humid environments such as bathrooms or basements, moisture-resistant OSB boards must be used with proper waterproof treatment; otherwise, long-term moisture exposure may affect structural stability.
Overall, the “OSB base layer + structural adhesive bonding” method is one of the most widely used and stable installation systems for Bamboo Charcoal Wood Veneer projects. It is especially suitable for commercial spaces, feature walls, renovation projects, and applications requiring high surface flatness.